


nvd72
-
Items
771 -
Registratiedatum
-
Laatst bezocht
-
Dagen gewonnen
2
Inhoudstype
Profielen
Forums
Kalender
Berichten die geplaatst zijn door nvd72
-
-
tegen idiote prijzen. goedkoper om zelf aan de slag te gaan.
ja kan wezen maar vind het makelijker om het te kopen.
-
Bereidingstijd: 20-30 minuten
300g bloem
200g grof volkoren bloem
1 theelepel zout
1 theelepel ′bread soda′(natriumbicarbonaat, of maagzout)
300-325cc karnemelk
1 ei
Voorbereiding
Meng alle droge ingredienten in een grote kom door elkaar. Zorg ervoor dat zowel het zout als het zuiveringszout goed gezeefd zijn. Klop het ei los in de karnemelk.
Maak een kuiltje in het midden van de kom, en schenk hierin 3/4 van het ei/ karnemelk mengsel. Vermeng nu het vocht met de droge ingredienten.Voeg eventueel wat karnemelk toe tot alle bloem gebonden is en er een niet helemaal droge deegbal ontstaat. De sleutel tot een lekker sodabread is een niet te droog deeg, al moet de deegbal wel hanteerbaar zijn. Strooi tot slot nog wat bloem in de kom en rol het deeg hierdoorheen.
Bereidingswijze
Doe het deeg in een ingevette 0,5 liter bakvorm. Maak een snede over de lengte van het brood, ongeveer 2 cm diep. Strooi een beetje bloem over het broodje. Van oudsher werd het brood zonder vorm gebakken, als een rond broodje. Daar werd een kruis in gesneden, in eerste instantie om de elfjes uit het deeg te laten, later werd dit kruis de zegening van het brood. De snede is dus meer dan alleen een snede. Dit is het moment voor de laatste ingredient!
Baktijd: 40 minuten op 200 graden, middenin de oven. Het broodje is gaar als het hol klinkt als er op de onderkant geklopt wordt.
Laat het dan afkoelen op een rooster. Tenminste, als je de verleiding kunt weerstaan om een stukje te eten met jam en boter....
-
 2
2
-
-
@ heksenboot ja beef jerky uit de winkel is opzich wel te eten.. niet mijn favoriet maar zeker niet slecht.
@ partizan en anderen ik zal binnenkort even een how to in het nederlands maken.
-
Bannock
Recipe #1 Simple bannock
2 ½ cups of flour
2 tsp baking powder
½ tsp salt
3 tblsp lard
1 cup cold water (approx)
Mix the dry ingredients together in a large bowl. Add the lard and mix in thoroughly. Gradually add the water (you may not need it all) and mix until the dough is thoroughly dampened, but not sticky.
Knead the dough on a floured board for 30 seconds. Flatten the dough to 1/2" thick. Cut into 8 pieces, and fry in a lightly greased frying pan, on medium heat, for 12-15 minutes each side.
Recipe #2: Bannock for six
3 cups of white flour
2 cups of whole wheat flour
½ cup of bran
½ cup of wheat germ
2 tbsp of baking powder
1 tsp of salt
2/3 cup of shortening
2/3 cup of milk powder
Tips for making Bannock
Tip #1
There are no rules. As you can see, the two recipes listed above are quite different. Bannock is usually made from whatever ingredients you have on hand. The recipe will be altered to create the type of mixture you require, for whatever method you are cooking it. Minimum ingredients would include some type of flour, and a liquid to bind the flour together. I have eaten bannock made from just flour and water, cooked on a hot rock, in an open fire, and I found it to be delicious. However, if you took the same two ingredients, and mixed in too much liquid, you will create a great glue for paper mache. In order to make great bannock, you must practice, practice, practice. Typical bannock recipes might include ingredients from the following categories:
Flour
white all purpose, whole wheat, cracked wheat, etc
Exotic types of flour could include flour made from the roots of plants, and the inner bark of trees.
Rendered Fat
butter, margarine, cooking oil, bacon grease and lard are among the modern favorites
Baking Powder
nice if you want the bannock to be fluffy and light in texture.
Salt
a pinch will help bring out the flavors
Sugar
brown is my favorite.
Tip #2
Always thourally mix the dry ingredients, then add the fat and mix again until it is all absorbed. Lastly add the water, a little at a time, until you have a dough of the right consistency for your cooking method.
Tip #3
There are many things you can add to Bannock to alter it's taste.
* flavored instant oatmeal can change taste and texture
* milk, either powdered or dry, will cause the bannock to brown when baked
* adding cornmeal, or rolled oats can change the texture
* any sweet liquid can be a substitute for both sugar, and moisture.
Some examples are corn syrup, maple syrup, honey, orange juice, Baileys, etc
* add instant coffee, or cinnamon
* try adding candied fruit, brown sugar, and cinnamon for a dessert style bread.
Tip #4
Cooking methods can change both taste and texture
* Baking in an oven usually produces a light, airy type of bannock
* If you roast it over, or in an open fire, the bannock will pick up some of the smoke flavor of the fire.
* It will absorb the flavor of any type of fat you fry it in.
* If thinned out, and poured into a hot, dry skillet, you will have hot cakes
* You can steam raw dough on top of any type of stew to create dumplings.
persoonlijjk vind het lekker gemenkt met beef jerky muesli en rozijnen/krenten.
een broodmix waar alles in zit is hier ook goed voor te gebruiken. ( scheelt een boel in tijd.)
mengen is trouwens goed te doen in een grote ziplock bag.
-
ps: tallow = talg (dierlijk vet) te verkrijgen bij de slager.
en beef jerky is bij de meeste supers/toko's/tankstations en outdoor winkels wel te verkrijgen.
-

Four Pemmican Recipes
By Filip Tkaczyk
Are you looking for some excellent pemmican recipes?
Wait, what is this thing called pemmican and where did it come from?
For starters, pemmican is originally a Cree word for rendered fat. Pemmican is a food used by a variety of Native peoples for many generations, and was adopted by the fur traders in the 18th and 19th centuries. It likely originates from North America. Native American scouts who spent a great deal of time on the go depended on having portable, high-energy, highly nutritious, and filling foods that would last for long periods of time. Often times pemmican was their food of choice.
This amazing stuff is a dried mixture of meat, berries and rendered fat (also called suet or tallow). It is an invaluable survival food that when prepared properly using good pemmican recipes can last anywhere from several months to several years without refrigeration!
Pemmican is a great asset to have with you while exploring the wilderness even today. Though most classic pemmican recipes require the use of meat and fat, it is also possible to make it vegetarian as described below.
Here are some great pemmican recipes you can try out to make this amazing food. Try out the following 4 recipes and see which one you like best!
Recipe # 1
Ingredients:
* 4 cups lean meat (deer, beef, caribou or moose)
* 3 cups dried fruit
* 2 cups rendered fat
* Unsalted nuts and about 1 shot of honey
Instructions:
Meat should be as lean as possible and double ground from your butcher if you do not have you own meat grinder. Spread it out very thin on a cookie sheet and dry at 180 degrees F for at least 8 hours or until sinewy and crispy. Pound the meat into a nearly powder consistency using a blender or other tool. Grind the dried fruit, but leave a little bit lumpy for fun texture. Heat rendered fat on stove at medium until liquid. Add liquid fat to dried meat and dried fruit, and mix in nuts and honey. Mix everything by hand. Let cool and store. Can keep and be consumed for several years.
Recipe # 2
Ingredients:
* 2 lbs dried beef (see recipe 1 for drying instructions)
* 1.5 cup raisins
* Beef suet
Instructions:
Grind meat to fine pulp in a blender. Now add in the raisins. Chop this mix enough to break up the raisins and mix in well. Melt the suet to a liquid and pour into the mixture, using just enough to hold the meat and raisins together. Now allow this to cool slightly. Put this into a pan and let it cool completely. Next, cut the pemmican into strips, than divide it into bars of about 4 long by 1 wide. Bag these separately and you can store them for several months.
Recipe # 3
Ingredients:
* Dried lean beef, buffalo, or venison (see recipe 1 for drying instructions)
* Beef suet
* Seedless dried fruit
Instructions:
Melt the suet until it becomes golden brown and liquid. Strain out any solids. If you cool it, re-melt it and strain it again it will improve the shelf life of the pemmican. Grind the meat into a powder. Chop or grind dried fruit and add it to meat. Pour liquid suet onto meat/fruit mixture. Mixes best if suet is warm, and allows you to use less of it. Now, press the pemmican into a tin using a spoon. Let cool in the fridge, than turn it out and cut into bars the size of candy bars. Wrap each bar in wax paper or paper lunch bag, label and store.
Recipe # 4
Ingredients:
* 2 cups dates
* 3 cups powdered jerky (or powdered tofu-jerky)
* 2 cups raisins
* Honey (as a binding agent, add as much as needed)
* 2 cups nuts
Instructions:
Grind all this material together, except for the honey. Add in the honey a little bit at a time, and mix well each time. Pour into pan until about three quarters of an inch thick or make them directly into bars. Refrigerate and cut bars out of pan. This is a sweet concoction and in cold climates, honey can be replaced with suet and processed just as in pemmican recipes seen above.
Tips for Making Good Pemmican
Here are some tips for you to improve your ability to use pemmican recipes properly, and make good pemmican:
* Talk to your local butcher to acquire the suet. A local co-op butcher might have the healthiest choices in terms of organic meats. You may be able to acquire the suet for free in certain places.
* When rendering (melting) the suet, be careful not to burn it or make it smoke.
* The warmer the climate you are going to be using the pemmican in, the less fat you need in it.
* This is also true for the time of year. Use less fat for the summer time, more for winter.
* Label what you make, especially if you try different recipes.
Lastly, remember to experiment with your own recipes. The key points for making pemmican are to make sure that you render the fat (suet) properly and to make sure that the meat and fruit you put into the recipe are very dry, not cooked or partially dry.
Try making some pemmican of your own today!
-
1
-
-
zou er mischien een onderdeel recepten bij eten en drinken kunnen komen?
weet zeker dat er genoeg shtf proof recepten om dit forum in de omloop zijn of onder de leden zelf, die het delen waard zijn.
-
ok goed punt rond de guard zaag ik m dan iets ruimer uit, en van daar uit, maak hem pas.
-
uh hier betaal je een fortuin voor sloop onderdelen voor een k30..
hier op de sloop staan 2 chevy k30's en een hilux ik weet zeker als ik 100 euro mee neem dat ik eerder die hilux voor dat geld heb dan 1 uitgebrande k30.
-
Het is dan ook een Foert, zou ik ook niet willen
Serieus, een 4x4 diesel pickup is echt wel een multi-functioneel voertuig hoor, dus zeker bruikbaar voor als het misgaat.
tja er zijn mannen ( vaak klein geschapen) die wel eens moeilijk doen om het merk
maar zonder gein een 4x4 diesel pick up heeft zijn plek ook wel.. maar vergeleken met andere optie's niet het beste
ik zou veel liever een toyota hi-lux uit 85 hebben dan een ford/chevy/dodge pick up puur van wege onderdelen en verbruik.
daarnaast is een hi-lux onverwoestbaar.
-
Klopt. Ik heb makkelijk praten. Maar ik heb ook wel eens heel kort in een flatje (één slaapkamer en een kantoortje waar geen bed in past) gewoond, en daar had ik binnen twee weken 4 mensen bij me in wonen. Hoe klein de ruimte ook is, je maakt er het beste van. Als iemand mijn hulp nodig heeft, zal ik al het mogelijke doen om te helpen. Zelfs als dat mij persoonlijk niet zo goed uitkomt.
Ik zou het niet anders willen.
En dat trekje gaat me waarschijnlijk heel zwaar opbreken bij SHTF. Want ook op 50 hectare kun je gewoonweg met te veel man zijn ben ik bang...
ik snap niet dat deze post een min kan opleveren..
ze neemt de moeite om het uit te leggen..
blijkbaar zit het in haar karakter om mensen te helpen en niet vanwege haar eigendom.. beetje jammer dat mensen hier om een min krijgen.
-
1
-
-
Een ander meer realistisch voorbeeld,Zondag ochtend staan er opdringerige Jehova's op de stoep.
Laat je die binnen?
sorry hoor maar vind nu niet dat je kinderen die waarschijnlijk honger lijden mag vergelijken met mensen die hun geloof proberen te verkopen..
-
maar mensen nu gooien we het eens anders..
stel die mensen die jij jaren niet hebt gesproken,waar je ruzie mee hebt of wat dan ook komen bij jouw aanklopen waneer er poep aan de muren zit..
zij hebben (kleine)kinderen bij zich wat doe je dan?
-
Voor mij is een 4x4 pick-up de beste preppers car. Ik kan de auto dagelijks gebruiken voor mijn werk, er kan een hoop (hoge) dingen in de bak. Mocht ik de auto nodig hebben in een shtf situatie heb ik er een Okanagan afzetunit bij een opzet camper dus ,die geprept is. Hier kan je met vier personen in slapen. Ook heb ik er een off the road motor bij. Mijn stelling is: Het beste shtf voertuig is een Pick-up
een pick up heeft zijn plek maar is zeker niet de beste shtf voertuig dat er is.
heb zelf een f250 gehad super ding om in te rijden maar voor een prepwagen hoef ik hem niet.
-
mn ouders en mn zusje zijn welkom, voor de rest moet de rest het zelf uitzoeken, ik heb niet de middelen om iedereen te helpen en dit wil ik ook niet.
-
vrouwtje en ik gaan een poging doen om een brood te maken op thee lichtjes mocht het lukken dan nemen we wat mee.
-
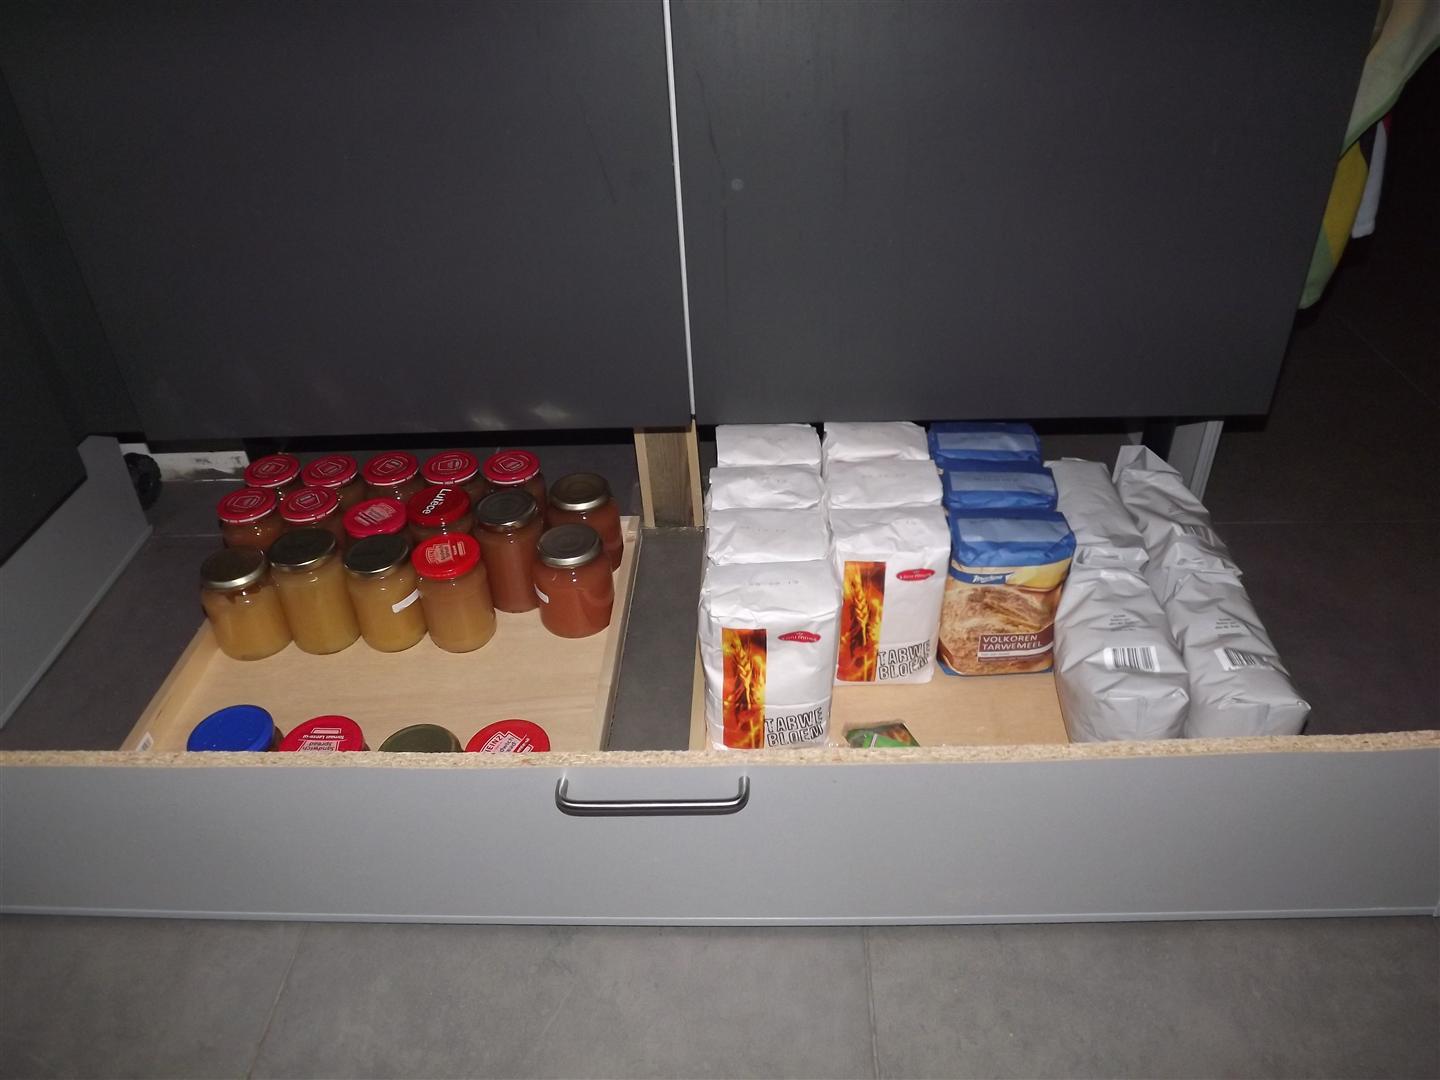
Het is maar een voorbeeld van wat je erin kunt zetten hè! Ik heb er voor de foto even pakken ingezet, Bloem is sowieso niet lang goed, dus tarwe wordt onze prep voor brood!
Hier de foto's
Echt niets te zien!
Tot ik op mn knieën ga zitten!
De lades
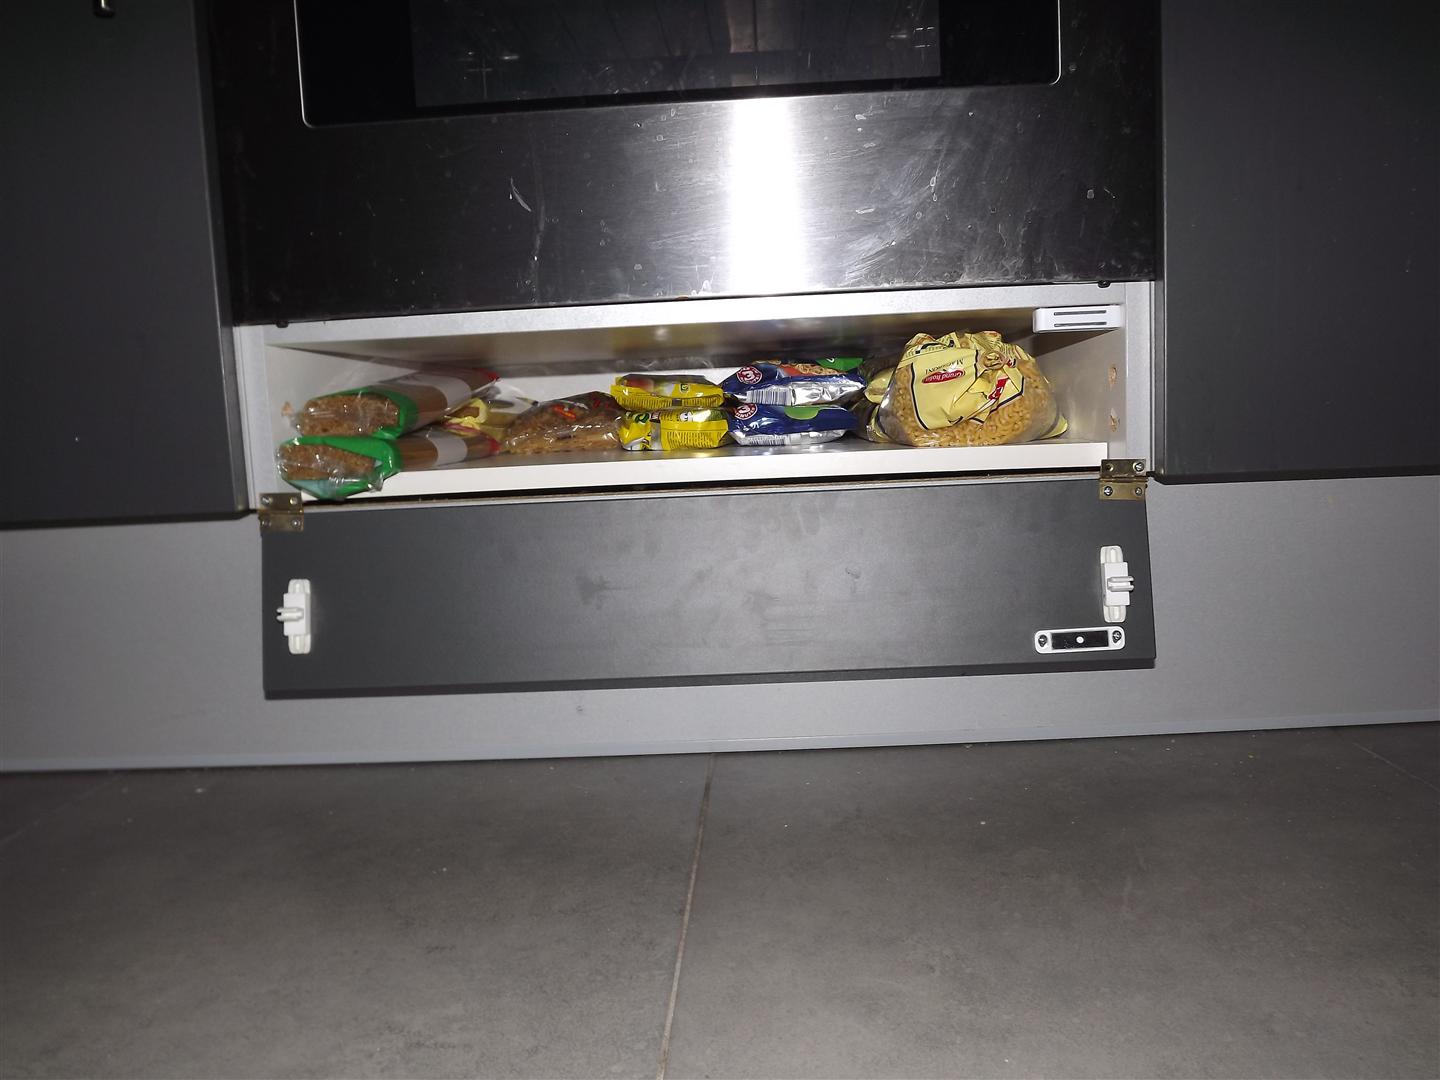
En onder de oven hadden we al een kleine ruimte ontdekt, eerst natuurlijk even de temp gecheckt, en die wordt hooguit 5°C warmer als de oven aan staat, dus daar wat pasta voor dagelijks gebruik in gelegd, (maar ook een mooie schuilplaats als je het mij vraagt!)
Let wel, wij hebben echt een héééle kleine ruimte onder de trap waar we ons dagelijks gebruik voedsel en water op slaan, lange termijn voedsel preps staan op zolder in plastic dozen met deksel.
Zoals hierboven al gezegd wordt, let op met water, en eventueel beesten! Nu hebben wij een hermetisch afgesloten nieuwbouwwoning én een kat en hond, maar dat zijn wel echt dingen om rekening mee te houden! Voor ons is dit een goede oplossing voor wat meer bergruimte, en niet geheel onbelangrijk, bergruimte uit het zicht! God weet wanneer dat nog van pas gaat komen!
ziet er goed uit! zou zo iets ook wel willen maken maar er past hier net een pakje sigareten onder de kastjes..
-
mischien een domme vraag maar zou je die blikken met baby melk ook gewoon kunnen drinken of gebruiken voor je pap of havermout?
-
zoals belooft, laat me even weten wat jullie er van vinden.
ik hoop dat het een beetje te zien is op de foto, helaas kon ik geen betere krijgen.
-
tuurlijk zal vanavond even een foto schieten als ik terug ben van werk.
-
lol
die incasseer ik met liefde,
hier hebben we het op de meeting nog wel over
Althans ik neem aan dat je komt.hahaha ja ik kom ook op de meeting
-
Ik zeg goed bezig.
deze streek levert je wel een -tje op
-
nvd laat je niet fokken aub
doe ik ook niet, ik geef alleen mijn mening.
-
Dat is goed voor jarenlange celstraf.
celstraf of niet.. de eerste de beste die denkt bij mij te komen rellen/plunderen heeft ook direkt een alle bastes groot probleem.
-
1
-


quickcloth
in Gezondheid, medisch en verzorging
Geplaatst:
is een tijd geleden ook ter sprake gekomen daar werd mij aangeraden het alleen te gebruiken als er mensen met voldoende medische kennis ter beschikken was.
(deze info kwam trouwens van mensen die in de medische wereld zitten.